Sunday, June 28, 2015

Bacterial Morphology - Interpreting Results from Agar

  Since the last few posts focused around experiments with nutrient agar plates, I thought it would be beneficial to discuss how the observations are determined and recorded. When microorganisms are grown in agar, a colony appears where the original organism was. These organisms show visible differences in appearance in their colonies and growth. These physical appearances are often for a specific type of bacteria that is being grown on that colony, and can be used as a method of identification.


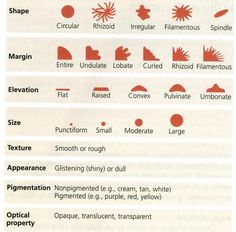
    When growing microorganisms on nutrient agar plates, it is important to observe the Size, Form, Margin, Elevation, Pigmentation, Texture, Appearance, and Optical Properties. The standards for identifying these physical appearances are as follows:

- Size
Pinpoint, small, moderate, large

- Form (shape of colony) 
Circular (unbroken, peripheral edge), irregular (indented, peripheral edge), rhizoid (root-like, spreading growth), punctiform (tiny), filamentous, spindle

- Margin (appearance of outer edge of colony) 
Entire (sharply defined, even, smooth), lobate (marked indentation, lobed), undulate (wavy indentation), serrate (tooth-like), curled, rhizoid (root-like), filamentous (threadlike, spreading edge)

- Elevation (the degree to which the colony growth is raised)
Flat (elevation not discernable), raised (slightly elevated), convex (dome-shaped), umbonate (raised, the elevated convex center region), pulvinate (very convex)

- Pigmentation (color of colony)
Nonpigmented (cream, tan, white) or Pigmented (purple, yellow, black)

- Texture
Smooth or rough

- Appearance
Shiny & glossy, dry & powdery, wrinkly

- Optical Properties 
Opaque (no light transmitted), translucent (partial light transmission), transparent


Hookah Hose Experiment Part 2 - Observation

    Over the course of 3 days, I allowed my bacterial sample from the hookah hose to incubate at room temperature. The following are my observations:

    Results at 12 Hours
After 12 hours of incubation, I already noticed slight bacterial growth along the spread line. The amount of growth seen in such short amount of time indicates a large amount of bacteria present upon sampling.


Size: Pinpoint, Small

Form: Punctiform, Circular

Elevation: Convex

Margin: Entire

Texture: Smooth

Appearance: Glistening

Pigmentation: White

Optical Property: Translucent


   Results at 24 Hours
After 24 hours of incubation, I noticed rapid growth results, as the colonies tended to merge into each other. The color changed from white to a vague yellow. I also noticed small growth outside of the colonies, as seen along the edges of the petri dish.


Size: Small
Form: Punctiform, Circular


Elevation: Convex
Margin: Entire


Texture: Smooth
Appearance: Glistening

Pigmentation: Yellow, White
Optical Property: Opaque


   Results at 48 & 72 Hours
After 48 hours on incubation, I noticed no significant additional growth patterns as seen from the results at 24 hours. Bacteria continued to grow in colonies along the spread line, as well as some minor growth along the sides. The growth within the colonies remained relatively the same. Yellow bacteria grew in colonies of larger circles, while white bacteria grew more spread out and in smaller circles. After 72 hours, I noticed the same amount of growth, with no changes.


Size: Small (White), Large (Yellow)
Form: Circular

Elevation: Convex
Margin: Entire


Texture: Smooth
Appearance: Glistening

Pigmentation: Yellow, White
Optical Property: Opaque


    According to my results, I could only distinguish between 2 different types of bacteria that were found on my hookah hose. In regards to my hypothesis of finding endospore growth, I found no filamental growth patterns to confirm this. I was also rather surprised to only find 2 distinct types of growth, rather than various growths, colors, and textures. While these results do not support my hypothesis of endospore growth, to conclude that there is no endospore growth in the hookah hoses, more specific tests would need to be preformed on various samples.

    The next post will conclude my results and begin the next step in my experiment as I test oils on bacterial inhibition. In order to identify the types of bacteria that have grown in my sample, I will perform a Gram Stain. In addition, to confirm lack of endospore growth, I will also perform an Endospore Stain test to see whether there is any sporulation activity.


Hookah Hose Experiment Part 1 - Introduction & Procedure

Purpose of Experiment:
    My first experiment is to take a bacterial sample from the inside of a hookah hose that was used at a public hookah lounge. I would like to observe the type and amount of bacteria that the inside of the hose is exposed to between multiple users and the heat and moisture from usage over time. In addition to observation, my purpose is to experiment with different cleaning solutions to determine what will best kill the bacteria and prevent future growth.

Hypothesis:
    Because of the length of use and multiple users, my hypothesis is that I will find a large amount of bacterial growth including a variety of bacteria. Due to the heat and moisture that the inside of the hose is constantly exposed to, I expect to find growth of endospores, which thrive in high temperatures and moist environments. Due to their extremely resistant cell membranes, they are tolerant to basic cleaning solutions and can continue to grow and spread in extreme environments. I expect that if I find any endospore growth, that essential oil Lemon and Oregano will be able to eradicate it's growth. Due to the biological properties of DoTerra Essential Oils, these pure oils from the earth are able to penetrate resistant cell walls and have been known to successfully eradicate and fight bacteria and endospore growth.

Background:
   A popular hang-out spot where I live is a local hookah lounge. Hookah is an age-old traditional way of smoking and vaporizing flavored tobacco called "shisha", originating in middle-eastern culture.

   The "shisha" is made up of tobacco that is saturated in molasses and added flavorings, and is packed into a glass bowl that is heated by coals. A typical hookah involves a bowl of shisha connected to a glass water basin, which the vapor is passed through before inhalation through an attached hose.

    The hookah lounge has strict cleaning regulations and procedures, so that the hoses are thoroughly cleaned after each use. For my experiment, I took an old, disposable hookah hose from the public lounge that had been regularly used by multiple people.

An old hose was selected and set aside after use and purposely not cleaned, allowing it to sit in a controlled environment and accumulate bacteria from previous use.

Procedure:
      1) Take sterilized swab and thoroughly swab the inside of the hose
      2) Spread swab over pre-prepared agar on petri dish
      3) Inoculate sample at room temperature for 3 days
      4) After 3 days, observe bacterial growth, looking for endospores and variation
      5) Inoculate bacterial sample into another petri dish for growth
      6) Apply 3 drops of pure Lemon essential oil to original sample
      7) Incubate Lemon sample for 3 days while allowing inoculated sample to incubate
      8) During 3 days, observe & record bacterial inhibition from Lemon treated sample
      9) After 3 days incubation, apply 3 drops Oregano essential oil to inoculated sample
      10) During 3 days, observe & record bacterial inhibition from Oregano treated sample
      11) Compare results of bacterial inhibition between Lemon & Oregano treated samples

In order to best observe the rate of growth and the amount of initial bacteria, I will be observing my sample in increments of time, at 12 hours, 24 hours, 48 hours, and lastly, 72 hours.


Wednesday, June 10, 2015

Getting Started with Agar

     As most of my experiments involve taking bacterial samples from everyday objects that we encounter, I have chosen to use a very neutral nutrient agar for bacterial growth. Nutrient agar is a great agar that is basically used as a bacteria "food", allowing bacteria to grow in a controlled environment. In this case, I will be taking samples of bacteria from everyday objects and placing them in petri dishes with the nutrient agar in them.

     I chose to purchase agar that I would heat and portion into empty petri dishes myself, rather than buying pre-poured agar dishes. I purchased my nutrient agar, petri dishes, inoculating needles, and sterilized swabs from Home Science Tools. The first step to getting agar plates ready is to melt the nutrient agar and pour them into the petri dishes, as shown below:


Nutrient agar is to be heated at 200 degrees Fahrenheit for approximately 1 hour, until it is pourable and completely liquid. Once heated, the agar is poured directly into the petri dish by opening the dish's lid just enough to pour the agar, in order to avoid contamination. There must be enough agar to completely cover the bottom of the petri dish. Here, I have heated enough agar to create a total of 9 petri dishes:


Once the agar is poured into the petri dishes, they must be allow to sit at room temperature for about 1 hour, until the liquid settles back into a gel. Once settled, the dishes must be refrigerated until use.

     After taking a bacterial sample with a sterilized swab, bacteria must be incubated at about 97 degrees Fahrenheit for 2 days, or room temperature for 3 days. Using a large plastic Tupperware dish (with lid), a heat lamp, and a temperature gauge (originally from my reptile kit), I designed a well-controlled environment were I can safely monitor, grow, and observe my bacterial samples:


     Now that my home laboratory is set-up, I can begin taking samples of everyday objects and allow the bacteria found on those objects to grow.